Showing posts with label Design Challenge. Show all posts

Wednesday, August 6, 2014

MDS Monday Sketch Challenge

I found a new challenge blog this week and had to play along because it is an MDS challenge blog, and frankly I adore MDS if you haven't guessed.

I bought a bunch of new downloads this week, hello, no shipping & instant gratification, and had to start messing around with my new goodies.
http://mdsmonday.blogspot.com/2014/08/mdsm76-dt-call.html

This challenge sketch uses one of the photo layouts that is ready to go in MDS, and the biggest challenge with this layout is finding imagery that will be long and wide.  Happily I was able to dig into my not to distant past and pull out images from my trip to Hawaii with my hubby.  Bless his work for sending him out there, and my mother-in-law for babysitting so we could go together.  Best week ever!

Here is my entry.  I am using the Playground Project Life download, and you can see other pages I created using this same set here.  Summer Starfruit is really growing on me using this set!  Background paper is from the Sweet Sorbet SAB collection.


Wednesday, October 19, 2011

Layering & Paper Piecing

This week on Creative-Sketches.com we are doing a layer sketch.  I came up with this as my final card.

I really enjoy tearing paper when I am working with a winter or hilly scene.  I adore this little snowman set, but then I have to admit, I am a sucker for anything with snowmen!  This set is called Snow Much Fun (#122562)  So I took our sketch of the week, then added a wonderful snowy background with my Northern Flurry Big Shot Embossing Folder. (#120902)  I flipped it around and sponged the back-the part with the dembossed side-so that the snowflakes would remain white and the paper would take the Bashful Blue ink color.  I really like this little technique because it is not the normal approach to using this embossing folder.

My tip when doing this: Use dimensionals to lift the embossing folder so that the impression does not get destroyed.

Then I stamped my images a few times on different pieces of paper.  You can use Designer Series Paper to do this as well and to great affect, but for my image it worked best with solid cardstock. I colored my images with markers and cut it all out to assemble it.

The bird and the snowman got stamped directly on my white background so that I could have the legs and arms on the cardstock and not trim around them.  They are really just too small to cut out effectively even using the Paper Snips, which in my opinion are the best little scissors for cutting.  I also highlighted portions of my image with our new glitter glue!  So easy to use, and what a cute effect!

So, now you know what I did, what will you create this week?  Enter your card on our challenge blog!

Thursday, June 23, 2011

Holiday Sketch My Digital Studio Father's Day


So this is incredible late, but I wanted to post my Father's Day card I made for my church group.  It is also Holiday Week for The Creative-Sketches.com blog challenge.  We are doing Holidays this week.

I normally don't do MDS cards for the site challenge, but I really loved this one.  My plan was to print it and turn it into a hybrid card.  I should have planned ahead and had it printed out.  My laser printer does not do a great job color matching with SU colors, which is truly disappointing.

Please visit the site to add your sketch to the site list.  Can't wait to see what you come up with!

Thursday, June 9, 2011

Week 2 - color challenge


This week at Creative-Sketches.com, our weekly challenge is a color challenge. We are using Real Red, Wild Wasabi, Soft Suede, and Whisper White! What a fun summery color combo.

I went with my new set, On The Grow, #123077-clear. I love that I can use my watercolor paper and aqua painter on this set. So fun! It makes me long for a Vespa.  I also used my brand new, and sadly about to retire background stamp, Sanded from the 2010-2011 Idea book.  Check out the Retiring List on my site for other wonderful stamps and accessories by Stampin Up! that are about to retire.

Try this color combination and see what you can make at Creative-Sketches.com.

Wednesday, June 1, 2011

Week 1 sketch- summer mini


I love the weekly sketches, for no other reason than getting the creative juices going.


This week I did a sketch layout from creative-sketches.com, with my new stamp set from the Stampin Up Summer Mini Touch of Kindness,#123203- clear. I adore cats, so when I saw the set, I had to have it!! Plus, I love to color, always love a session of coloring therapy! I also used my newest Big Shot die, with two scalloped squares.  They are absolutely wonderful! The designer series paper is the flip side of the fantastic Play Date Designer Series paper, which is on sale and will be retiring at the end of the Month.  Supplies for this paper are limited, so order soon!

My posting this month has been a bit slow, but please visit Creative-sketches.com to try our weekly challenges!  We have a new one each week.

Thursday, May 5, 2011

Creative Sketches Design Challenge


My new box arrive this week with my pre order materials from the Summer Mini Catalog.  Yeah!  I adore all my new toys. This card uses the fabulous Florets Stamp set. I didn't use my coordinating paper or embossing folder yet, but believe me, they are coming soon!

My sketch this week from Creative-Sketches.com was a fun and simple sketch. 

I almost turned the sketch horizontally,but decided to try and plan it as intended.  I'd love to see what you can make with it, so pop over and submit your designs.  Can't wait to see what you make.


Thursday, April 21, 2011

Creative Sketches Week 3

This week at Creative-Sketches.com, I was working with this layout below from our Design Team Lead.  I really wanted to go with a clean simple project, and I was excited that this layout will allow me to use minimal layers, and just pare it down to basics, but still create a lovely card to send to a friend. To make my life a little more fun, I took some color inspiration from the lovely Inkspirations-challenges Blog.  I look forward to their color challenges as the encourage me to mix up some colors I otherwise would never match myself. Regal Rose and Sahara Sand poor things, almost never get used at my house!


Our Technique challenge this week was Using Chalks or Pastels on your card.  I have done several different cards using chalks, and took a different approach this week.  I wanted to use my pastels very simply, trying to make this more of a minimal card.  I stamped my background image in Versamark, then popped chalk to highlight just a few flowers.  I also added some turquoise chalk to my eggs in the basket.  Both are fairly subtly and easy to add simply with the little wands that come in the Stampin Up pastel kit, or with a cotton swab. 


I hope you can visit Creative-Sketches.com to try your hand at either the Layout or Chalks Technique!  Can't wait to see what you make!


Add caption

Thursday, March 31, 2011

Faux Mother of Pearl Technique


Week 5 on Creative-Sketches.com is Anything Goes with a twist-try and use the sketch in your project but in any format you want.  So, I wanted to try the newest technique from the Demonstrator  Support Magazine I get each month from Stampin Up.  It uses the awesome Frost White Shimmer paint which I almost never use, but always love when I pull it out again.  Silly me!


I will be teaching this technique next week at my technique Tuesday class, so I won't go into details now. Join me for class if you are local, or contact me if you would like to sign up for my distance techniques class.  Enjoy the sketch, and stop by Creative-Sketches.com to try your hand at our weekly contest!

Thursday, March 24, 2011

Creative Sketches Week 4 Mother's Day


This week, the Creative Sketches Design Team tries to combine a Sketch and a Holiday card.  Knowing that Mother's Day is really not all that far away, I started thinking of what my mom might like to get in the mail. My Mom does not love pastel colors, which typically are used in the spring and for Mother's Day so that makes it challenging to make a card for her.   She loves rich jewel tones though. I was thrilled that I was able to combine the Color Challenge from Just Add Ink (Rich Razzleberry, Old Olive, Crumb Cake, and Whisper White) with the Creative-Sketches.com Sketch Challenge to come up with a card that I think my mom will love!


This adorable card uses one of my favorite Holiday stamps sets, All Holidays.  It covers just about every major holiday in the year.  So versatile!  I pair with my trusty Big Shot Top Note Die, and Vintage Wallpaper Embossing folder, my new Boho Blossom punch, the two Step Bird Punch, and some wonderful Designer series paper from the Bold color pack.

To add a little sparkle on this card, I used my favorite Old Olive 5/8" grosgrain ribbon, a Rich Razzleberry brad, and some wonderful pearls. I love the different sizes with the pearsl too!

So, go on over to Creative-Sketches.com and post your holiday card! Can't wait to see what you make!

Thursday, March 17, 2011

Creative Sketches Week 3


This week on creative-sketches.com we went with a fun challenge - Fancy Folds, Cuts, or Punches. I combined this with a challenge from my upline as well.  We took tags we made at a downline meeting and turned them into cards.  My "tag" card began with a wonderful 3x3 card with the Big Shot Daisies and the new blossom punch.  I scallop punched, embossed, and created tada! a mini folding card mounted on a larger card.  You could glue the bottom edge of them small card and use it to hold a tag that pulls out, or just have 2 places to write a loving note to a friend.

Thursday, March 3, 2011

Creative Sketches Week 1 Challenge


This week for our sketch challenge, we had a vertical layout with several thin layers.  I decided to use one of my layers with a stamp instead of adding a piece of cardstock.  It is a little hard to see in the picture, but look to the left of the larger image.  I used my other layer as the edge of the top note die.


I have really struggled with Poppy Parfait as a color, but this color challenge from Handstamped Sentiments provided the Colors for the week, Pear Pizzaz, Poppy Parade, and Blushing Bride.  I like the combo very much.  I will definitely be using it again soon!  I cheated slightly and added a tiny sliver of Crumb Cake!  Sorry guys!

The stamp set I used is Just Believe.  I absolutely this set and have used it several times.  I had not used the frame stamp though so it was great to get that inky!  Hope you like it and want to go over to Creative-sketches.com and give it a whirl for yourself!

Wednesday, March 2, 2011

Leprechaun Punch Art Owl


Someone posted a request for a Punch Art Owl on a yahoo group I belong to, and I just had to give it a whirl.  I don't have a tutorial up for this yet, but I can provide a long list of punches!


Two Step Owl Punch
Large Oval punch
Two Step Bird Punch
Corner rouncer
small oval
1 3/8" Circle
word window

For the most part all the pieces you need come from the Owl punch.  I got the heart for the nose on the punch to be the beak, and the bowl tie, small circles to be the eyes themselves and the gold coins.  The wings came from the bird punch, as did the branch.  I punched out 2 vests, and trimmed one and made it look more vest like. Folding and creasing the white vest gives a better illusion of a shirt front, and it makes it easier to center the other pieces. 

The hat was tricky.  I punched half a large oval, then punch a small oval with black, and cut a strip with the large oval.  Then I trimmed both the hat shape with a curve across the top, and the trimmed the edges of my black curved hat band to fit. I added a small black piece inside my yellow square so I could have a buckle.  I experimented with all sorts of hat brims, but in the end it made my owl less owl like so I skipped it.  Normally leprechauns have a beard or a mustache, but the best I could do was some wonderful orange eyebrows.  I tried hair, and it just looked funny but feel free to experiment on your own.

I did need a pot of gold at the end of my rainbow, and my large oval along with 1 3/8" circle created the pot.  The handle was made using a small oval punched first, then a large punch second to get the thin handle.  It is not the right shape to got vertically in the air, so off to the side of the pot is prfect!  I filled it with gold coins from my owl punch.  Be careful, they really fly everywhere with those guys!!

I just have to point out the adorable shamrock is from the Free Sale-A-Bration set, So happy for You, as is the sentiment.  I also used the layout from inkspirations-challenges.blogspot.com.  But I did need to tweak the layout to accommodate all my rainbow colors.

Any questions, feel free to post them in the comments below.

Thursday, February 24, 2011

Creative Sketches Week 4 Challenge

So our sketch this week at creative-sketches.com uses a triangle layout which is not something I normally do. I really enjoyed pushing triangles around trying to get the right look.
I have not done anything with my Eat Chocolate set in a few weeks, so I wanted to test it out along with the color challenge this week on Inkspirations-Challenges.blogspot.com.


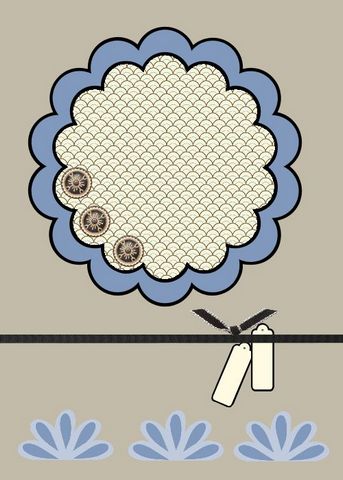
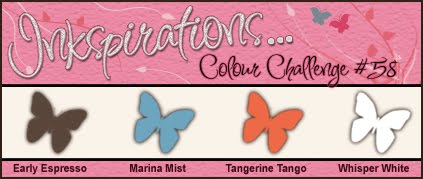
The colors are Early Espresso, Marina Mist, Tangerine Tango, and Whisper White. I think it makes a great manly color combination, and I am going to try it again with another stamp set.  My to do list portion can be pulled out like a tag.  I made that work by running my adhesive around where I planned the tag to go, but not all over.  texture from the Square Lattice Big Shot made me need a bit more adhesive, but definitely stepped up the look of the card. I also really like my 1/8" Early Espresso ribbon.

So what can you create with the layout?  Come on over and submit your link.

Tuesday, February 1, 2011

Diva's Challenge #212 Color Challenge


I love doing Color challenges!  They get me thinking of colors I might never have put together.  This week at DivaCoffeeBreak Challenge, the combination was a great one!  Mambo Melon, Old Olive and Peach Parfait.  I don't think I ever would have put those three colors together, but they look wonderful together!


To make my card, I used the Layout sketch from last weeks Mojo Monday.  I did the card last week in time to enter it, but I had a rough weekend with a sick kiddo in the hospital and never got a chance to post to their site.


As soon as I saw this layout I knew I wanted to use Full of Life from Stampin Up!.  It is a great stamp set filled with fun sayings.  One of my personal favorites in the set is "Life is what happens to you when you're busy making other plans."  by Josh Lennon.  I experimented with circle shapes and used my Circle #2 Big Shot Die. I didn't want to pull out the Circle Cutter to make a 2 3/4" circle, so I used the Scallop Flower Fold technique.  I cut out out two scallops, scored them in between scallops, snipped to the center on one line, and folded into a fan.  I used two scallops to give myself the volume  needed. Once I had both scallops folded into a fan, I glued them together making sure the creased aligned perfectly.  It gives a wonderful puffy fan.  And I have no idea how I would ever mail this card!

I also used my newest Designer Series paper, the Bold DSP pack along with the Bold buttons,  Must confess, that is a Pumpkin Pie button.  But it works since the cardstock in Peach Parfait.  I needed a shocking amount of glue dots to get everything together, but I love it!  I think I might have gone overboard with my Striped Grosgrain ribbon this week, but I love that stuff!  I promise the next card will use another ribbon!

Thursday, January 27, 2011

Just Add Ink Inspiration Challenge


This Challenge from Just-Add-Ink gave a inspiration image to start.  They have chosen of all things, my favorite flower, the sunflower.  Stampin Up! used to have a wonderful set using sunflowers which I bought before it retired a few years ago, and there is no way I'll be parting with that, but I wanted to try doing something different, a punch art sunflower.

 
So I got out my Daffodil delight Early Espresso, and Old Olive cardstock and went to work!   My large oval, 1/2" circle, and large 2 3/8"Scallop  were all that I needed to make a great flower.  The rest I sponged, tore, and popped until I had everything where I wanted it!

Then of course I needed a saying, so I pulled out Teeny Tiny Wishes, since the flower filled the whole card, and used my two tag punches to make a nice little saying.  A little bit of striped 1 1/4" Grosgrain Ribbon finishes off the card.

Wednesday, January 26, 2011

Creative Sketches Week 4 Holidays


This week at Creative-Sketches.com we are creating a card for  a Holiday. Since Spring is coming our way, and I made about 5 valentines day cards this week, I was in the mood for something else and went with a Mother's Day Card.

I really love the stamp set Just Believe, but so far I have not tried using it on moist watercolor paper. I colored in the flowers and inked up the grass then pressed firmly on my damp but not wet paper.  I also tore the edges for the deckle edge.  I also just got some wonderful new ribbon, Blushing Bridge Stitched Poly Ribbon.  It is heavy weight stuff, but makes a great bow!  My final step was to turn this into a Mother's day card.  The modern label punch would have worked, but instead I used a smaller approach with the Word Window punch, then embellished it with another stamped flower. This time I did not use moist watercolor paper, but colored it and cut it out. I added a Pearl in the center to give it a little more polish.  Now to store it somewhere safe until it is time to send it to my Mom!  Pop over to Creative-Sketches.com and post your holiday card.

So when I started the card, I just chose the colors myself, or so I thought.  After I was popping around on a few other sites, I remembered seeing the Inkspirations Challenge Color Challenge this week.  So my first version was all but perfect except I forgot the Early Espresso on the card.  So I stamped it again, and here we are!...I just found another fun challenge site, and had to submit this there are well.  They wanted a card with a bow :)  Thank you Pals Paper Arts!  I love bows!  I also submitted it to CraftyCardmakers Challenge site with their Floral Challenge.

Thursday, January 13, 2011

Thank you Dad! - Totally Tool

My parents came to visit us over Christmas break,  and it was wonderful having them!  I was particularly grateful that my dad was able to fix one or two things at the house that have gone under the ready for awhile.  So I borrowed this wonderful Set, Totally Tool #113256 and made this card to send to my dad.  I'll be sending it out tomorrow!

I was also able to tie this in nicely into the Diva Coffee Break Challenge with their color challenge with Bashful Blue, Sahara Sand, and Night of Navy.  I had never combined those colors, but it is a perfect manly combo!

Totally Tool
Big Shot and Square Lattive embossing folder
Night of Navy, Bashful Blue, Sahara Sand, and Very Vanilla Cardstock
Bashful Blue and Sahara Sand markers
brads

Creative Sketches Week 2- Color Challenge

This week at Creative-Sketches.com we were working on a color Challenge with Black, White, and Brushed Silver.  I love the a la carte stamps Stampin Up! carries in the back of each Mini catalog and in the Main one, so I wanted to highlight one of the newest ones, Be My Valentine # 122045

I chose Basic Black Cardstock and ran it through my polka dots embossing folder.  Then I took my Brushed Silver cardstock and scalloped each edge with my scallop border punch.  I inked up my stamp twice, and stamped on my whisper white cardstock with Basic Black ink, and then on scrap with Real red ink for a very subtle pop of color.  I trimmed out my Valentine Sash, and mounted it on my card with dimensionals.  Before I attached the silver and white pieces, I carefully added a Basic Black taffeta ribbon around the edge of my card and adhered my bow with a mini glue dot.  I love that stuff.  You can't really see it in the picture, but I also added two rhinestones to the smaller flowers on the top half of the heart.  I do love a little bling! I think the overall look is very elegant, but somewhat masculine because of the color palette.

What can you make with just Black, White, and Silver?  Pop over to Creative-Sketches.com and post your link!  Can't wait to see what you make!

Wednesday, January 12, 2011

Late Night Stampers Challenge 103 Brrr


This challenge at LateNightStampers was focused on things that make you say Brrrr!  Since we have  had a shocking amount of snow lately, I chose to do a scrapbook page of our last snow storm.  The snow storm thoughtfully came while the kids were on winter break, and everyone loved it!  The city basically shut down for 2 days while people waited for the road crews to dig us all out!  So fun to be snug inside drinking cocoa, watching movies, then diving into snow drifts!

So I created this in My Digital Studio, using the Candy Cane Lane Paper, and A Cute Christmas mittens stamp.  I added as embellishments a snowflake punch, a round Baja Breeze button and a silver brad.  I also added a grosgrain ribbon as well peaking out underneath the designer series paper.  I would love to color in the stamped mittens, but I loved resizing them to fit the space I needed perfectly!

Monday, January 3, 2011

Mojo Monday 172 - Eat Chocolate Stamp Set

It's a new year, and there are more Design Challenges to enter!  I really enjoy the Mojo Monday one, and it is a always exciting when I can get to it on a Monday!


This layout is really not something I normally do in my own work, so it was stretch for me.  But I love my new set Eat Chocolate from the new Stampin Up Occasions Mini catalog, and I knew it would be perfect for this layout. Picking a good color combination was hard since I knew I wanted a lot of browns, but I went with Chocolate Chip, Crumb Cake, Pretty in Pink, and Ridinghood Red. I love my Big Shot Embossing folders, and the square lattice one gave me some fun texture that almost mimics a cork board to hang my to do list.  I used my spiral border punch and love the fun note pad feeling that gives!  And any good notepad is a little distressed, so crumpling and sponging worked for me there. My Jumbo Brad felt like a giant push pin too!  Love those little guys!

I didn't use actual brads as indicated by the layouts since my stamp had the 3 square check boxes. I think that works just as well in this case! I also inked only the saying at the bottom of the stamp to use as my highlighted rectangle strip.
Related Posts with Thumbnails