Showing posts with label embossing folder. Show all posts

Tuesday, November 5, 2013

Thankful Thoughts

post signatureOne of my favorite things in November on Social Media, and blogs I follow is the daily "Thank You Moments".  I am not as wonderful about posting them on my family blog, but I do try to get a few up there during the month, or in my journal.  I thought I'd make a Thanksgiving type card to show awesome fall colors, and so send to someone truly special.  Everyone knows that getting some thing in the mail that isn't Junk mail is so very special!

So here is is, Gently Falling, Gorgeous Grunge, and Chalk Talk! I combined those cards to do some fun two step stamping, don't worry, it doesn't need to be perfect, and used the leaf outline stamps to create my own patterned paper on some Very Vanilla card stock.  I used Cherry Cobbler, Soft Suede, Crushed Curry, and Pumpkin Pie, can't get more fall like than that!

I also layered my punches to create a neat new look.  I saw this on Pintrest, can't recall the card I copies, but what a great idea to turn the Modern Label punch and layer under the Wide Oval, and because I love tags so much, I made one more to add in that pop of color.

Super fun to do, and fast and easy!  Shop Online Now to order any of these materials!

Just a thought for a unique scrapbook/gift idea, take a photo each day of something you are thankful for, add your daily message, compile both into a simple scrapbook, maybe a 6x6 or smaller, and you have an awesome Christmas gift for a loved one.


Saturday, July 27, 2013

Smash book- Stampin Up style!

I ordered the This & That Journal, washi tape, save the date stamp, and sticker set from the new catalog but I hadn't quite gotten all my supplies out until today.  With a somewhat cleaner space on my desk, I was ready to play!

I just got back from a month long trip with my kiddos for a family reunion and have really enjoyed seeing all sorts of wonderful things across the Midwest.  This smash book may turn into my scrapbook for the trip,  but I may have to go digital after all and do it with MDS!

So, the stickers are awesome,  but I saved most of them for the inside pages. I can write and stick on photos as I go because there is an awesome pocket right inside the cover which will store my stickers. The washi tape is so much fun to work with!!  I love that the interior pages are dsp which coordinates the whole book!  I also love the larger spine,  as I could see this book getting huge!  

I don't have my hexagon punch yet,  comes this week, so I had to make do with cutting banner ends!  I didn't stamp much on the cover,  just sponged the edges a bit to bring out the texture of the card stock.

I recycled the original tag from this book, I just loved it!  The pool party and calypso coral combo is just wonderful.  

After I put together the cover,  I threw together two thank you cards using my Oh Hello set,  the hexagon embossing folder, and scraps of Pool Party, Very Vanilla, Calypso Coral, and Basic Gray .  I stayed with friends on my trip,  so I have lots of cards to send out! I am really pleased with both cards and it felt do good to be crafting again instead of painting my house!


Wednesday, October 19, 2011

Layering & Paper Piecing

This week on Creative-Sketches.com we are doing a layer sketch.  I came up with this as my final card.

I really enjoy tearing paper when I am working with a winter or hilly scene.  I adore this little snowman set, but then I have to admit, I am a sucker for anything with snowmen!  This set is called Snow Much Fun (#122562)  So I took our sketch of the week, then added a wonderful snowy background with my Northern Flurry Big Shot Embossing Folder. (#120902)  I flipped it around and sponged the back-the part with the dembossed side-so that the snowflakes would remain white and the paper would take the Bashful Blue ink color.  I really like this little technique because it is not the normal approach to using this embossing folder.

My tip when doing this: Use dimensionals to lift the embossing folder so that the impression does not get destroyed.

Then I stamped my images a few times on different pieces of paper.  You can use Designer Series Paper to do this as well and to great affect, but for my image it worked best with solid cardstock. I colored my images with markers and cut it all out to assemble it.

The bird and the snowman got stamped directly on my white background so that I could have the legs and arms on the cardstock and not trim around them.  They are really just too small to cut out effectively even using the Paper Snips, which in my opinion are the best little scissors for cutting.  I also highlighted portions of my image with our new glitter glue!  So easy to use, and what a cute effect!

So, now you know what I did, what will you create this week?  Enter your card on our challenge blog!

Friday, July 22, 2011

Iris Folding-ornament punch

This week our challenge was to do a Card using Iris Folding. I have never done this before, and it was so much fun to learn how to do it, and then make a card myself.


To make an Iris Folded card, you need to have this strips of folded scrapbook paper. Then you layer them around in a pattern based on your template or shape you want to use.  If you google it, you can come up with tones of free templates, and some really interesting projects.  Mine is a great beginners project though!


I had my ornament punch and wanted to do my folds using that punch so I created my own template. I basically took my punch traced it out, then doodled around with my ruler until it looked good to me. I have a picture of my template. I'll clean it up and add it as a new file for downloading.

Then I used my punch piece and laid it down and taped it with scotch tape so I could check my work. Layer up your strips, trim the excess and go around until you get to the center shape. I popped my ornament with dime Sui dale and finished my card with glitter, and a greeting from Greetings Galore. Simple but fun!

Give it a try, and post your project at Creative-Sketches.com.


Monday, July 18, 2011

Two step stamping with Raining Flowers and Workshop Words!


Free stamps stamp better! It is simply more fun with free goodies! I got home from Utah last night and could not wait to get my newest stamp sets inky!! This card is for one of my customers to thank her for a recent order. I'm using the new set in the catalog that all convention attendees received Raining Flowers. I also used a wonderful new set that we earned by going to different classes, Workshop Words! What a great set! I will be using it quite a lot as I plan on doing many more workshops!

I used 3 new colors, Lucky Limeade, Island Indigo, and Pool Party. Stampin Up has the most fun color names! I also used my square lattice embossing folder and color spritzer to give some great texture to the cardstock.

Raining Flowers is a 2 step stamping set. 2 step stamping is a great technique and a lot of fun to do. The catalog has a special symbol to indicate which sets can be used as 2 step stamping. If you don't know how to do that technique and would like to learn it, I'd be happy to teach you! Click on my events page to schedule a workshop on an open workshop night, or contact me to arrange a convenient time.

Thursday, March 24, 2011

Creative Sketches Week 4 Mother's Day


This week, the Creative Sketches Design Team tries to combine a Sketch and a Holiday card.  Knowing that Mother's Day is really not all that far away, I started thinking of what my mom might like to get in the mail. My Mom does not love pastel colors, which typically are used in the spring and for Mother's Day so that makes it challenging to make a card for her.   She loves rich jewel tones though. I was thrilled that I was able to combine the Color Challenge from Just Add Ink (Rich Razzleberry, Old Olive, Crumb Cake, and Whisper White) with the Creative-Sketches.com Sketch Challenge to come up with a card that I think my mom will love!


This adorable card uses one of my favorite Holiday stamps sets, All Holidays.  It covers just about every major holiday in the year.  So versatile!  I pair with my trusty Big Shot Top Note Die, and Vintage Wallpaper Embossing folder, my new Boho Blossom punch, the two Step Bird Punch, and some wonderful Designer series paper from the Bold color pack.

To add a little sparkle on this card, I used my favorite Old Olive 5/8" grosgrain ribbon, a Rich Razzleberry brad, and some wonderful pearls. I love the different sizes with the pearsl too!

So, go on over to Creative-Sketches.com and post your holiday card! Can't wait to see what you make!

Thursday, February 24, 2011

Creative Sketches Week 4 Challenge

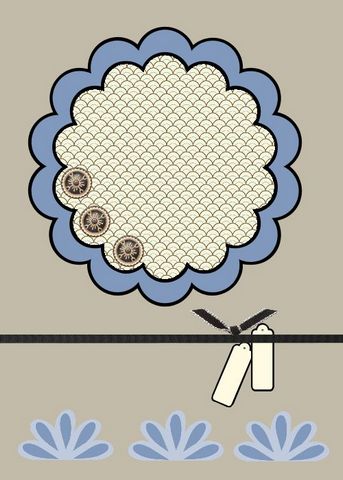
So our sketch this week at creative-sketches.com uses a triangle layout which is not something I normally do. I really enjoyed pushing triangles around trying to get the right look.
I have not done anything with my Eat Chocolate set in a few weeks, so I wanted to test it out along with the color challenge this week on Inkspirations-Challenges.blogspot.com.


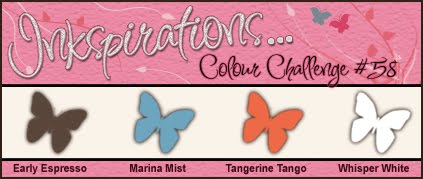
The colors are Early Espresso, Marina Mist, Tangerine Tango, and Whisper White. I think it makes a great manly color combination, and I am going to try it again with another stamp set.  My to do list portion can be pulled out like a tag.  I made that work by running my adhesive around where I planned the tag to go, but not all over.  texture from the Square Lattice Big Shot made me need a bit more adhesive, but definitely stepped up the look of the card. I also really like my 1/8" Early Espresso ribbon.

So what can you create with the layout?  Come on over and submit your link.

Thursday, January 13, 2011

Thank you Dad! - Totally Tool

My parents came to visit us over Christmas break,  and it was wonderful having them!  I was particularly grateful that my dad was able to fix one or two things at the house that have gone under the ready for awhile.  So I borrowed this wonderful Set, Totally Tool #113256 and made this card to send to my dad.  I'll be sending it out tomorrow!

I was also able to tie this in nicely into the Diva Coffee Break Challenge with their color challenge with Bashful Blue, Sahara Sand, and Night of Navy.  I had never combined those colors, but it is a perfect manly combo!

Totally Tool
Big Shot and Square Lattive embossing folder
Night of Navy, Bashful Blue, Sahara Sand, and Very Vanilla Cardstock
Bashful Blue and Sahara Sand markers
brads

Clean and Simple - Punch Bunch

I was preparing for my Stamp Club and wanted to try some clean and simple stamping.  I used the new Sale-Bration set Punch Bunch, which I absolutely love!!   I really like this minimal look, so give it a try at home, or come to club and try it out with me.

This fun card was made by running my Poppy Parade cardstock, throught my trusty Big Shot and my with my Elegant Bouquet embossing folder.  Then Iinked my stamp and used my blender pen to remove some ink to color my stamp with Old Olive and soft Suede.  I punched out my center, then the scallop and placed the scallop base down on the card, then popped the center.  I also stamped the scallop on the inside just for fun.  Simple, easy basic stamping.  It just look awesome when you are done!


My second card is a fun non traditional "love" color palette, but could be given to a guy!  Masculine cards always seem a little harder to me.  My husband is not into ribbons, lace, glitter, or bling.  Silly man!  I used Pear Pizzaz, Temping Turquoise, and Chocolate Chip.  I stamped and punch the owl, then stamped the hearts and popped Mr. Owl on the heart string. Then I added my little Love you in chocolate chip. I layered it all up on Chocolate Chip, Pear Pizzazz, then Confetti White as the base.

Monday, January 3, 2011

Mojo Monday 172 - Eat Chocolate Stamp Set

It's a new year, and there are more Design Challenges to enter!  I really enjoy the Mojo Monday one, and it is a always exciting when I can get to it on a Monday!


This layout is really not something I normally do in my own work, so it was stretch for me.  But I love my new set Eat Chocolate from the new Stampin Up Occasions Mini catalog, and I knew it would be perfect for this layout. Picking a good color combination was hard since I knew I wanted a lot of browns, but I went with Chocolate Chip, Crumb Cake, Pretty in Pink, and Ridinghood Red. I love my Big Shot Embossing folders, and the square lattice one gave me some fun texture that almost mimics a cork board to hang my to do list.  I used my spiral border punch and love the fun note pad feeling that gives!  And any good notepad is a little distressed, so crumpling and sponging worked for me there. My Jumbo Brad felt like a giant push pin too!  Love those little guys!

I didn't use actual brads as indicated by the layouts since my stamp had the 3 square check boxes. I think that works just as well in this case! I also inked only the saying at the bottom of the stamp to use as my highlighted rectangle strip.

Tuesday, December 28, 2010

Punch Art Elf Card

I made this little guy before Christmas, but just finally got a chance to post this.  This guy take a lot of pieces to create.  I didn't get a chance to create a tutorial, but here is a quick list.
Ornament Punch-hat and face
Owl punch - I used the small heart to make the ears and hands and bow, eyes and center of the bow
Oval- bite off the top of the hat, legs
Word window -Socks
Trio hearts-arms, and collar, feet
1/2" circle nose and puff on the hat
Large tab-shirt
I think that is everything.  I also used the Snowflake embossing folder and white craft ink to create a fun winter scene.  Feel free to email me for a better picture, or if I can, recreate him and post the pieces. I made a UPS guy clock once, and he is similar in concept to the body of the UPS guy.

Wednesday, December 15, 2010

Penguin Punch Art Card & Tutorial


We got snow in Virginia this week, and I felt inspired to make this cute little penguin with my Owl Punch.  I really do love that thing because there are so many different types of owls.


I also just got my new Northern Snowflake Embossing folder recently and needed to make a wintery scene for my little guy.

So to make a penguin you need...
The Two Step Owl Punch (#118074), the Heart to Heart Extra Large Punch (# 119881), and 1" Circle Punch (#119868)

 
Punch the Owl body, Large heart, and eyeball in Basic Black, and trim the feet off.  Punch the feet with a little extra space and small heart from the Heart to Heart Punch in Pumpkin Pie. Punch the eyes and tummy in Whisper White.  Punch another eye ball in Brushed Silver.

Cut the Silver eyeball in half.  Cut the Large heart in half.  You may need to trim the ears off the owl.

First adhere the feet to the back of the body, then add the whisper white tummy to the body.  
 
 Put it up slightly higher than normal (sorry, the step by step was a little lower than I meant to do)
Next add the flippers on the side of the body and trim the ears to fit.

 
Add the circle head on top of the body.

Follow up with the heart beak and eyes, and eyelids.  Last step is to add a touch of white to the eyes.
 
 So I got some feedback that the owl looked a little sad, so here are my ideas to fix that problem,  either remove the silver eyelids, or trim them into crescents to look more open and cheerful.

Saturday, October 9, 2010

Punch art pumpkin


I made this card a few weeks ago but finally took a picture so I can post it. I had seen a few friends working with paper tags and breaking down the fiber to curl it and shape the paper so I wanted to try that. I also love using my punches for punch art!

This pumpkin uses my large oval, my scallop oval, and a scrap from a circle punch to create a wonderful pumpkin. I flicked the edges of the pumpkin with Cajun craze, a new color this year.

I love my paisley prints stamp set and it made a wonderful fall background for card. A matted piece of paper run through my big shot embossing folder completes the card.

Wednesday, September 29, 2010

Always Elegant Suite Invitation


This elegant invitation is perfect for an elegant party. This uses the Always Elegant & Inviting stamp sets, the elegance wheel, the elegant lines embossing folder, and the elegant soirée designer series paper.

I added some bling with our half back pearls, very vanilla satin ribbon, and 1/8"
Taffeta ribbon.


Wednesday, September 22, 2010

Spooky Halloween card


My UPS order came and I pounced on the box eager for my web embossing folder. I ran a piece of black card stock through and lightly sponged whisper white craft ink on the web. I love the eerie look it gives!!
Then a punched piece of scalloped old olive, a piece of wicked cool, a large whisper white scallop circle, pierced in each scallop and finally I combined using two stamps to get a new saying! I masked my spooky stamp and stamped each half of my original stamp.I used markers to color each section in too. I love the result!

Thursday, August 26, 2010

Baby Shower Diaper Cake, Invite, and Favor


My neighbor is having a little boy and I teamed up with neighbors to help throw a baby shower for her.  Unfortunately due to timing, I was not able to be there day of, so I asked to do my favorite part which was easy to do ahead of time, and I got to try out a new Stampin Up set and wonderful new Designer Series paper from our Nursery collection.

This was my first diaper cake, and with the help of my girls, cake pans, and elastic bands, it was easy to put together. The girls rolled the diapers for me and slipped the elastic bands-the thin skinny bands for doing their hair so it would be easy to undo and use afterwards.  Then we stacked them into the different sizes of my cake pans and tied the ribbons around each layer.

The favor was really easy to make with the help of my Big Shot Box #2 die.  I cut belly band strips of designer series paper and added a little teddy bear from the Baby Bundle stamp set.

The invitation was the most fun to make.  I embossed the baja breeze, chocolate chip, and crumb cake cardstocks, and colored the little buggies and shirts. I printed out the invite info so that I didn't have to write it out, and used the adorable t shirt wheel to add an extra touch to the card inside

Monday, August 16, 2010

Summer Mini Card - SCCSC27

I demonstrated this card at a workshop Saturday using supplies from the summer mini.  It was simple to put together and would be easy to duplicate and make multiples! I almost never tear paper for my cards but I had fun doing it this time. (Thank you to the  inspiration from our monthly Demonstrators magazine and our online Facebook like community for Demonstrators!) I just love using both sides on my Big Shot Lattice embossing folder!

I am really going to miss these stamp set at the end of the month!  I used a saying from Favorite Thoughts, and my favorite summer set, Tropical Party, with the coordinating Designer Series Paper.  To order these, visit my store online before August 31, 2010 or they will be gone!

Friday, August 13, 2010

Wedding Invitation Suite

This is the first in my Stampin Up! handstamped line of DIY invitations.  Choose your wedding colors from our incredible selection of inks, paper, and accessories.  I design, print and prep your invitation suite package.  You simply with meet me, stamp and assemble, and mail.   Prices vary according to materials used.  Custom designed invitations are also available. Long distance ordering is an option.  I will create a custom instruction sheet and you can assemble in you own home.

Fifth Avenue Floral Wedding Suite


I just created this combination using Cherry Cobbler, Peach Parfait and Very Vanilla cardstock. I used my trusty big shot and my Manhattan floral embossing folder to dry emboss different sections of the invitation suite.I also stamped with the Fifth Avenue Floral stamp set with Cherry Cobbler and Peach Parfait ink.

To order your wedding collection, contact me! Other colors and designs are available.
 Prices vary based on design and materials.


Thursday, May 27, 2010

Color Challenge SCCOLOR18


I made this card for a color challenge today. We could use Whisper White, Basic Black, and any color. I chose Mambo Melon. I used my uninked Fifth Avenue Floral stamp set and the Manhattan Flower impressions folder.

I ran the impression folder through the Big Shot, and lightly rubbed the raised surface with my sponges. The color immediately highlighted the embossed sections, and colored the rose area. Then I stamped the saying on whisper white and added an edge of a flower stamped off once to give the lighter version of Melon Mambo ink. I flicked the edges, and added it to a basic black mat. A strip of ribbon finished off this simple card.
Related Posts with Thumbnails