Showing posts with label Holiday Mini Catalog. Show all posts

Saturday, November 19, 2011

Craft fair

Today I did a vendor fair at a community fundraiser. I had a great time and was glad to help support a really neat individual.

I made range of items including; reindeer food, bookmarks, notepad holders, post-it pads with pens, and several other items. It was fun making everything this past week, and now I have some great experience! I also was able to use many scraps from my stash of retired paper and embellishments. I'll have to go back and link to all the great websites I used for inspiration! Thank you to all you creative folks out there with wonderful ideas!!!


Saturday, November 5, 2011

Fall themed workhop

I'm doing a workshop today with my friend Brenda, and she chose a fall theme for the Holidays with a scrapbook/home decor project.


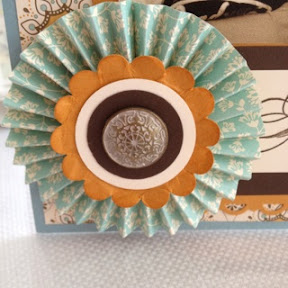
I created this adorable page that can be used a framed art, or put in a scrapbook. I had so
Much fun with my Simply Score Tool! It makes creating these little flower embellishments so easy.


I am also showing how to make simple stocking stuffers with votive candles.


I also had to add a simple Birthday card using spice cake dsp. I adore this paper!!! I used out wonder hostess set for the birthday greeting.


Monday, October 24, 2011

No sew pin cushion and Sewn version

I found this awesome pair on this blog, and had to CASE it! Thank you for the inspiration!


Sewn version first-
I adore my Big Shot for fabric projects. I used my square scallop die to cut out 8 squares from my Spice Cake fabric.
See together with right side out so you have the scalloped edge. Repeat 4 times and then sew the top and bottom block. Now you have a front with 4 squares and a back. Press with an iron. Go around the edges leaving a hole out for stuffing. Stitch the open edge closed.

Take two buttons and a large needle. Go from side to side pulling the buttons in to create a divet. Snip thread all over and you are done!


No sew version-
Cut a 8" square of fabric and grab a handful of fluff. I used a fancy feast cat food can, but a different small container would work for this project as well. Think small flower pot or metal can.

I cut a 1.25" x 12 strip and wrapped my can. I heated hot glue, and ran a bead of glue around the top of the can. Wrap the fabric and fluff in a ball, and pit inside the cat food can without burning yourself! Tie a bow or embellishment and you are done!

Friday, October 21, 2011

Advent Calendar project in the works

I have been searching for the perfect advent calendar for years ever since we had children. This year, I will have one that I will be able to use for years to come!  Stampin' Up! thoughtfully created a great new advent stamp set that I am going to use to make an incredible calendar for this year.  I will also be using the new coordinating Big Shot die and  1" Square punch.  I debated doing it on paper or in a frame like the awesome one I saw at Stampin Up! Convention, but I think I like this new idea better.  I will be using a 25 small boxes around a frame so I can put little treasures inside for my children to take out each day!

I will stamp, punch and color, and then decoupage all the boxes, and create a wonderful punch art for inside the advent frame!  Winter Wonderland, snowmen, and glitter here I come.  No finished pictures yet since I finally found a supplier online for the box frame, and they have been shipped out Wednesday. Normally I try and use only Stampin' Up Products, but I needed something that we didn't have-gasp!. 

Check back next week to see what I have created!  This is a great holiday gift which I will be selling only 2 of at a local benefit in November.  If you want to order the materials or a complete kit, please contact me!

Wednesday, October 19, 2011

Layering & Paper Piecing

This week on Creative-Sketches.com we are doing a layer sketch.  I came up with this as my final card.

I really enjoy tearing paper when I am working with a winter or hilly scene.  I adore this little snowman set, but then I have to admit, I am a sucker for anything with snowmen!  This set is called Snow Much Fun (#122562)  So I took our sketch of the week, then added a wonderful snowy background with my Northern Flurry Big Shot Embossing Folder. (#120902)  I flipped it around and sponged the back-the part with the dembossed side-so that the snowflakes would remain white and the paper would take the Bashful Blue ink color.  I really like this little technique because it is not the normal approach to using this embossing folder.

My tip when doing this: Use dimensionals to lift the embossing folder so that the impression does not get destroyed.

Then I stamped my images a few times on different pieces of paper.  You can use Designer Series Paper to do this as well and to great affect, but for my image it worked best with solid cardstock. I colored my images with markers and cut it all out to assemble it.

The bird and the snowman got stamped directly on my white background so that I could have the legs and arms on the cardstock and not trim around them.  They are really just too small to cut out effectively even using the Paper Snips, which in my opinion are the best little scissors for cutting.  I also highlighted portions of my image with our new glitter glue!  So easy to use, and what a cute effect!

So, now you know what I did, what will you create this week?  Enter your card on our challenge blog!

Thursday, July 14, 2011

Convention- sneak peek holiday mini

So exciting to be here! Just finished the first general session! Wow! I'm so excited about our July $99 recruiting special starter mini kit!


Best part is the incredible Christmas box that the new recruit will receive for free.


Contact me before July 31st to take advantage of this incredible offer.

We also just got a sneak peek of the Holiday mini for this fall, and my jaw is on the floor! I can't wait to start preordering in august, and start my new holiday classes and crafts. Can you say advent calendar? With a great big shot die to make it with?


Stamping Up is going to be launching their very own Simply Scored tool. Wow! Score 12x12 paper, every 1/8", stylus comes with, plus 3 awesome little place markers. Perfect time saver, so good for all 3D projects!  This little beauty will be available September 1st, and I know you will want one for all your 3d projects.  It will come out in The Holiday Mini catalog.  If you are not on my mailing list, and would like to be added to the list, please contact me with your information.  This will also be available through my store online.

Please be ready to come and make incredible holiday projects! This new mini is out of sight! Pictures to come!!

Wednesday, January 12, 2011

Late Night Stampers Challenge 103 Brrr


This challenge at LateNightStampers was focused on things that make you say Brrrr!  Since we have  had a shocking amount of snow lately, I chose to do a scrapbook page of our last snow storm.  The snow storm thoughtfully came while the kids were on winter break, and everyone loved it!  The city basically shut down for 2 days while people waited for the road crews to dig us all out!  So fun to be snug inside drinking cocoa, watching movies, then diving into snow drifts!

So I created this in My Digital Studio, using the Candy Cane Lane Paper, and A Cute Christmas mittens stamp.  I added as embellishments a snowflake punch, a round Baja Breeze button and a silver brad.  I also added a grosgrain ribbon as well peaking out underneath the designer series paper.  I would love to color in the stamped mittens, but I loved resizing them to fit the space I needed perfectly!

Monday, January 3, 2011

Filled With Love - Valentine's Day Bundle


Valentine's Day is the second biggest holiday for sending cards, and during Stampin' Up!'s Filled with Love promotion, you can get an exclusive package of Designer Series Paper perfect for creating cards for family, friends, classmates, and more!

From December 17, 2010 through January 24, 2011, get a FREE package of Bitty Buttons--a $4.95 value--when you purchase an exclusive Filled with Love Bundle. This bundle contains the Filled with Love Set (on page 43 of the 2010 Holiday Mini Catalog) and Love Patterns Designer Series Paper Pack.

Download the flyer for complete details, item numbers, prices, and photos!  Or pop straight over to my online store and start shopping! Click on the link, then click shop now under products. Remember to check out the Clearance Rack for some incredible deals!!

Thursday, December 30, 2010

Creative Sketches Week 5 Project


am so excited!  I got accepted on a design team for Creative Sketches.  So today I am posting my first project as a member of a Design team.  How fun!

Our project this week was anything goes, so I made a simple diaper fold pouch for some Christmas treats. To make a Diaper Fold Pouch you need a square piece of paper, folded in half like a triangle, then the joined sides fold in to touch the opposite edge.  Fold the top flap over and hold with a piece of adhesive then decorate.  You can size this up or down as needed.  My piece here was 7" and fits 2 Chocolate squares. A 6" piece will hold 1 treat very nicely.

I love being able to coordinate paper, stamps, and ink!  Thank you Stampin Up!  I love my A Cute Christmas stamp Set with Candy Cane DSP.  I am going to miss these guys! 

Pop over to the blog and post your project and link!

Wednesday, December 15, 2010

Penguin Punch Art Card & Tutorial


We got snow in Virginia this week, and I felt inspired to make this cute little penguin with my Owl Punch.  I really do love that thing because there are so many different types of owls.


I also just got my new Northern Snowflake Embossing folder recently and needed to make a wintery scene for my little guy.

So to make a penguin you need...
The Two Step Owl Punch (#118074), the Heart to Heart Extra Large Punch (# 119881), and 1" Circle Punch (#119868)

 
Punch the Owl body, Large heart, and eyeball in Basic Black, and trim the feet off.  Punch the feet with a little extra space and small heart from the Heart to Heart Punch in Pumpkin Pie. Punch the eyes and tummy in Whisper White.  Punch another eye ball in Brushed Silver.

Cut the Silver eyeball in half.  Cut the Large heart in half.  You may need to trim the ears off the owl.

First adhere the feet to the back of the body, then add the whisper white tummy to the body.  
 
 Put it up slightly higher than normal (sorry, the step by step was a little lower than I meant to do)
Next add the flippers on the side of the body and trim the ears to fit.

 
Add the circle head on top of the body.

Follow up with the heart beak and eyes, and eyelids.  Last step is to add a touch of white to the eyes.
 
 So I got some feedback that the owl looked a little sad, so here are my ideas to fix that problem,  either remove the silver eyelids, or trim them into crescents to look more open and cheerful.

Monday, December 13, 2010

Family Photo Card

I am running behind on this, but I hope I still have time to get these printed and mailed before Christmas.  IN an extra stroke of luck, I wrote the Christmas letter for the family, and did that for the back side so I don't have to print out anything else!  Yeah My Digital Studio!!!

This was all designed in MDS using the Candy Cane Lane Photo Card Bundle, however I chose to design my own card instead of the predesigned one.  We also took the picture ourselves using a timer and tripod.  That was insane, but that is another story!

Sunday, December 12, 2010

Designer Fabric Apron- Free Pattern Included

My upline group had our Christmas party yesterday, and we had a Yankee Exchange Christmas Swap. The criteria for the exchange was to make a homemade or handstamped item that would be valued at $20 at a craft fair.


I decided to make an apron using my Designer Series Deck the Fall Fabric. (#121716) It took the better part of the entire package, but I still have some scraps left over for ornaments and fun coasters.


I have included my simple pattern for the apron. It should be pretty simple to follow, but email me with questions. Next time I think I will include a pocket on my apron. You could also make a fuller ruffle if you want to add an extra strip. There would be enough fabric to do that.

Also, you could include some contrasting trim using the Bigz XL Die Tasteful Trim (#120893) or fun flowers using Bigz Flower Folds Die #115970.


You need 1 package of Stampin' Up! Designer Fabric

1st panel  Stampin' Up! Fat Quarter 28x18”
Cut 2nd panel at 4”, 8” and 12” to create the waistband.
Cut 3rd panel at 2“ and 4” to create seam binding for the sides.
Cut at 8” and12” to create the ruffle. If you want a fuller ruffle, cut a third panel for your ruffle.


Sewing Instructions:

Press all the panels flat before you cut. Cut pieces and get ready to sew. You will need thread, lots of pins and your iron handy as you work.  Press all seams after you finish them for a more finished looking piece. I like to zigzag all my finished seams to give a more finished look when I sew, but that is up to you.  I used a 3/8" seam allowance throughout the project.

Sew the ends on the ruffle together. Pres seam flat. Zigzag the bottom edge of the strip ruffle, and fold 1/2” over the edge making a hem and sew 3/8” from the edge. Press flat.

Sew the top edge of the ruffle with a loose running stitch to gather the fabric. Pull in gathers and adjust to fit.  Pin to the main apron panel and sew the ruffle to the apron.

Sew the waistband strips together on end and press in half. Turn wrong sides together, sew and then turn inside out (This is the trickiest step since the strip is about 2 yards long.)  and press.

To make binding, fold the strips in half, then fold the raw edges in to the center and press flat. Fold the entire strip together and press the binding flat. Pin those strips to the panel edges, and sew to the main panel.

Pin the finished waistband to the top of the apron, and sew to the center panel. Turn the waistband ends inside, and sew. Press all the seams and trim loose thread.

Thursday, December 9, 2010

Christmas cookies and Free recipe!


My neighborhood had a cookie swap and had prizes for taste and presentation. So I had to throw my hat in the ring. I used my all time favorite Cowboy Cookie recipe and created a recipe card in My Digital Studio. I used my A Cute Christmas download stamp set in MDS so that I could also use my matching Candy Cane Christmas fabric, (#121715) cardstock, and Candy Cane Buttons (#121718) to make the recipe card and bag work together.


I bought a white ceramic plate from the dollar store and dressed it up with a coordinating decor elements rub on.(Candy Cane Christmas #120912) I can make about 15 different things with that set and they all make great gifts!!


Since I wanted the cookies to stay on the plate I had to use a cookie bag to hold everything. I found a simple red and white candy one, but I would have preferred a clear one.


If you would like the recipe, comment below and I will email the cookie card.
I didn't win, but I'll try again next year!

Sunday, November 21, 2010

$200 raffle basket


I had a great afternoon with 4 other ladies doing a multi vendor holiday open house. We had a good turnout, and if you missed a chance to get in on the incredible basket with $200 worth of goodies from Stampin Up!, Lia Sophia, BeautiControl, Thirty-one, and PartyLite, there is still time to earn raffle tickets.

Until next Friday, if you book a workshop with me or place an order with me, you will earn Raffle Tickets for the large basket. Booking workshops earns 5 tickets, and every $10 spent earns 1 ticket. Orders can be placed online, emailed or called in to me to earn tickets.
Every $50 order placed with me earns a free framed art project in additional to the
Raffle tickets.


I also was holding an added incentive tree and will allow you to choose an envelope from my booking tree as well. The tree held items from $3-$10. You would receive them with your workshop order.

Please contact me with any questions, or to place orders. If you would like to order Christmas cards, contact me as well.

Saturday, October 9, 2010

Punch art pumpkin


I made this card a few weeks ago but finally took a picture so I can post it. I had seen a few friends working with paper tags and breaking down the fiber to curl it and shape the paper so I wanted to try that. I also love using my punches for punch art!

This pumpkin uses my large oval, my scallop oval, and a scrap from a circle punch to create a wonderful pumpkin. I flicked the edges of the pumpkin with Cajun craze, a new color this year.

I love my paisley prints stamp set and it made a wonderful fall background for card. A matted piece of paper run through my big shot embossing folder completes the card.

Wednesday, October 6, 2010

Technique Tuesday- Thumping


Each month I teach a techniques class where we go over 2 different stamping or crafting techniques. Participants gradually build up a binder full of things to try with a sample sheet and 2.5x3.5 sample as reference.

This month we did shimmery resist and thumping. I think thumping was my favorite! Similar to coloring with markers, thumping takes an inked stamp and thumps or taps markers in it to change the color. It is simple things that packs a lot if punch! With shimmery resist I got to play with a little known pot of shimmer paint to create a subtle yet lovely background to the card.

I made my thumping sample card using the hostess level 2 stamp set from the new Holiday mini. I love this stamp set!! I will also be using this set in my upcoming holiday stamp a stack. (Saturday the 9th 1-3)

Sunday, September 26, 2010

Altered Pumpkins


I talked about these yesterday but never actually posted their picture. I started off my Halloween decor mission with 3 foam pumpkins, a package of decor elements, and a package of black suck on rhinestones.

I cut apart my phrase and sections of my Jewels and then transferred them to my pumpkins. The jewels have a sticky sheet you use to Transfer which makes it really easy!! I might still add some black lace, but I'm not sure yet.

Saturday, September 25, 2010

Spooky Decor Elements serving ware


I don't have any Halloween dishes really, but I bought the sheet of decor elements to make my Halloween pumpkins, and then I had lots of pieces left over.

I went to walmart and bought 3 inexpensive white porcelain dishes and applied my Decor elements on them. I just tested them out at my Open House and they have done quite well at holding food and being washed and tried. I am not going to try the dishwasher, but they do well by hand! Yeah!

I could even make place cards and invitations with the coordinating stamp set!


Friday, September 24, 2010

Open house Treat Sneak Peak


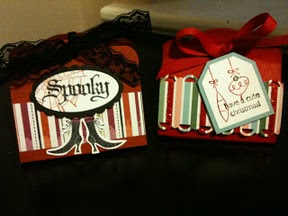
I wanted to share these two cute little Treat holders I created for my open house. These are great for any occasions, but i made halloween and christmas treat holders.

All you need is a stamp set for any occasion, and the tags die for the big shot. (cut paper to 4.5x3) It is a simple but adorable candy holder that goes together very quickly! Choose any embellishments you want. Mini glue dots work well to adhere the candy to the treat.

Tuesday, September 21, 2010

Quilted Top Note technique

I have seen several cards like this before, so I had to try my own. I punched out several squares from my candy cane dsp, then glued them down in a checker hoard pattern to a 1/4 sheet of whisper white. I flipped it over and cut it out with my Top Note die.


I stamped the real red cardstock, and
Added a few more details like another square, and the real red 5/8" grosgrain Ribbon. I piped the top note.

I could have added some white pen faux stitching or done some actual stitching with a Zig zag stitch on the card itself.
Related Posts with Thumbnails