Showing posts with label 3D Project. Show all posts

Saturday, November 19, 2011

Craft fair

Today I did a vendor fair at a community fundraiser. I had a great time and was glad to help support a really neat individual.

I made range of items including; reindeer food, bookmarks, notepad holders, post-it pads with pens, and several other items. It was fun making everything this past week, and now I have some great experience! I also was able to use many scraps from my stash of retired paper and embellishments. I'll have to go back and link to all the great websites I used for inspiration! Thank you to all you creative folks out there with wonderful ideas!!!


Monday, October 24, 2011

No sew pin cushion and Sewn version

I found this awesome pair on this blog, and had to CASE it! Thank you for the inspiration!


Sewn version first-
I adore my Big Shot for fabric projects. I used my square scallop die to cut out 8 squares from my Spice Cake fabric.
See together with right side out so you have the scalloped edge. Repeat 4 times and then sew the top and bottom block. Now you have a front with 4 squares and a back. Press with an iron. Go around the edges leaving a hole out for stuffing. Stitch the open edge closed.

Take two buttons and a large needle. Go from side to side pulling the buttons in to create a divet. Snip thread all over and you are done!


No sew version-
Cut a 8" square of fabric and grab a handful of fluff. I used a fancy feast cat food can, but a different small container would work for this project as well. Think small flower pot or metal can.

I cut a 1.25" x 12 strip and wrapped my can. I heated hot glue, and ran a bead of glue around the top of the can. Wrap the fabric and fluff in a ball, and pit inside the cat food can without burning yourself! Tie a bow or embellishment and you are done!

Saturday, July 23, 2011

Simply Scored Tool Raffle September 10th - Enter Now!


I love to make 3d projects for myself, as gifts, in Classes, and in workshops.  I have been using my little black slider on my old Stampin Up! Paper trimmer.  It works after a fashion.  But more often then not, I mess up, and each project I try and score is either done wrong or is not identical to the others.  My reject pile can't get pretty high on some projects! This is really frustrating to me so when Shelli announced on Main Stage that we would be getting a Simply Scored Tool, I was absolutely thrilled!!  Our Simply Scored Tool holds 12x12 paper.  It has 1/8" tracks which is absolutely great!  It comes with 3 little place markers that stick in place on the edge (Tiny hash marks on my paper trimmer were not working for me).  It also includes a stylus with 2 different size ends.  The stylus glides wonderfully well on paper and cardstock! It has nonskid nonmarking feet on the bottom, and has a little storage slot for a bone folder, lipstick, candy, or extra markers.

The best part in my opinion are the rulers.  We have 2 different rulers, one goes from 0-12".  The other starts in the center at 0" and goes out in each direction.  Thank you so much for that one!!  Perfect for some many uses.  The Rulers will not fade or wear off either. And because they know it will happen, they sell extra feet and stylus.  I'll probably lose mine at least once!

So now you know all about it's features, now look and see some of the fun things you can make!


Did I mention as a demonstrator I can preorder it August 1st?  That might be one of my favorite benefits as a demonstrator getting to order product early!  I was not one of the lucky winners of a Simply Scored Tool Prize Patrol at Convention, but I'll have mine soon enough!  It is so worth signing up on my Team in July, just to get the Simply Scored Tool a month early, and at a 30% discount!


Now that you love it and absolutely want to have it, here is how you can win it for free!  During the month of August you can earn tickets for my Raffle in September. I'll be giving away a Simply Scored Tool to one very lucky ticket holder.

To enter the raffle: 
Like/Follow me on Facebook at Facebook.com/StampPaperScissorsInk and comment on my Facebook page to earn 1 Ticket.


Attend a Class and place a $50 order at class to earn 1 Ticket. Bring a Friend and Earn 1 Ticket.


Place an order online (or email me your order) for $75 and receive 1 ticket.  Each additional $75 order earns another ticket.

Host a Workshop in August or schedule your workshop for September to earn 2 Tickets.

Attend a Workshop with a friend to a workshop and receive an extra Ticket.

Place a $50 workshop order and earn 1 Ticket.

Sign up as a Demonstrator to earn 5 tickets.  Sign up Before August 16th and earn an extra 5 tickets.


Please add a comment below and let me know your ticket progress!

Saturday, January 22, 2011

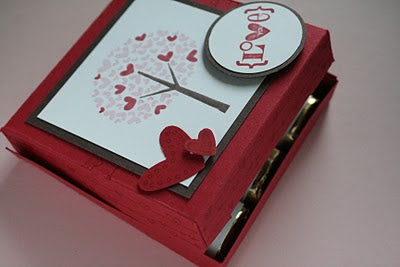
3x3 Pizza Box - Free Template


This adorable little box is made from a half sheet of cardstock, scored, folded, decorated, assembled, then finally glued! I used Valentine defined again from the Occasion Mini Catalog.  This little box will be part of my Love Sweet Love Class, which will be available as an online class/kit for purchase. I will send you all the supplies and instructions to make the 2 cards and the pizza box for $8 (Includes shipping).  I'll have a list of additional supplies which can be purchased though my website.  (stamps et, blocks, ink, etc)

I do love my heart punches, and had to bring back the coordinating stamp from my Love you Much set.  My next project is going to dust of the entire set and bring back my favorite little mouse, but in the mean time, it fits perfectly in my punch! 

I still say when in doubt, labels make the best Nugget wrappers.  Designer Series paper is always adorable, but in a hurry, stamp and wrap!  I made a simple divider to keep the chocolate in place, but when you are done, the box can be reused to hold your 3x3 note cards.

I have included the template to make this little guy, but you can also watch an awesome video by fellow Demonstrator Mike Funke, and he also has a handy mathematical formula for figuring out how to make the box at any size. (On a side note, I met him last year at Convention -.  Really great guy, and always fun to meet a guy demonstrator!)

I made a second box last night using a set of Free Rub Ons that Stampin Up gave all the demonstrators. With that box I included a set of 3 note cards.
I love the Red tree with the Crystal Effect Hearts.  I think it really makes the card pop!

If you would like to order a box & set of cards for yourself, it is also $8 plus shipping.

This template has instruction for a 3x3 box.  Check out Mike's blog to get the formula to enlarge the box.  Happy Stamping! I also have submitted it to the handstampedsentiments blog challenge.

Saturday, March 20, 2010

A Good Egg Pop Up card #2


I did this card once already, but reworked it slighlty. The grosgrain ribbon is a bit bulky, so I used the new Satin ribbon this time. I also used more Shades of Spring DS paper for the eggs, shells, and as a mat. I am pleased with the subtly upgrades to this fun card!

Friday, February 26, 2010

Matchbox Big Shot Die- Blog Candy


I got my new Matchbox Die a few weeks ago, but have not broken it out of the package until just recently. Tonight I whipped out my favorite Cottage Wall DSP, the Dreams Du Jour Stamp set, and the Sizzix Little Leaves Die.

I will need to get some little treats for this. This is going to be my first Blog Candy Post, so leave me a comment and you will get this adorable little box, and another box filled with treats.

Monday, October 26, 2009

Stamp Club Cards

My stamp club met on Friday, and we had a wonderful time with 3 new projects. I also promised them measurement of some sample I brought. I have to thank my wonderful upline Colleen Magness for the Happy Holidays card, and the idea for the Photo Gift box.

Photo Gift Box
12x12 piece of cardstock scored & trimmed
3 3/4 " x 3 3/4" designer series paper, scraps of coordinating cardstock, ribbon, and other embellishments & punches

I have not added my pictures, but I know this is a great gift idea! Score the 12x12 on the 4" and 8" lines on each side. Trim in from 0-4" and 4=8" on the 4" and 8" line. You will have 4 separate cuts on 2 lines. Now you fold each side in. It is easier to fold before you add all your embellishments. Now go crazy and fill in the 9 boxes. I used Cottage Wall designer Series papers, Old Olive, Pale Plum, Orchid Opulence, and Rich Razzleberry cardstock. I also used the Define your life Stamp set in the center.

For your Box top, you need a 6x6" piece of cardstock, scored 7/8" from each edge. Trim in on notch on the corner so you can fold in the tabs to make the top. Decorate the top of the box to match the theme of your scrapbook page.

One of my stamp clubbers suggested this would be a wonderful ornament gift box with a holiday theme and photos of the family. It makes a great gift container, and then a page to put in your album.


Happy Holiday card
This one was made a my Upline's monthly meeting. I absolutely love the simplicity of this card. Thank you Colleen!

Friday, October 16, 2009

Santa Big Shot Treat Holder


Yesterday I went to a meeting my upline was having, and we could bring a 3D Holiday item as a Shoebox Swap. I loved the Mummy I made a few weeks ago and I wanted to see if I could turn that same basic idea into a Santa. I googled the Coca Cola Santa for inspiration, and then went to town.

This little guy is pretty easy, but has lots of steps. I started with 4 card size pieces sheets of cardstock I ran through my Top Note Die on my Big Shot. Then I sketched out a rough hat shape and trimmed that out of Real Red, and then trimmed out the lower half of Santa's beard, and used the scrap white to make my fur trim for the hat. Apricot Appeal made a perfect face for Santa. I used my sponge Daubers and pastels to add blush to his cheecks.

I trimmed scallop oval made perfect mustaches after I cut it in half and scooped out the middle a bit. I punched 2 whisper white 1 inch circles for eyes, and 1 more for a pompom hat. I also punched 2 basic black half inch circles. I punched a 1 inch circle from real red and cut that in half for the lower lip. I used my slit punch for a nose from pretty in pink. I used my small oval to punch out eyebrows from whisper white. I took the Basic Black pastel and darkened my eye brows.

I took a Sahara Sand marker to add details for the eyebrows and mustache and beard. I also used the sponge dauber on the edges of the beard. I also used my White gel pen as a highlight on the eyes, nose and lower lip.

And no Santa would be complete without a touch of dazzling diamonds on the pompom and hat trim.

To Assemble Santa, I filled a small cello bag with soft peppermints and stapled the bag shut. then I used a pop up glue dot on each side and pinched the two together. Santa can stand up by himself now!

Feel free to duplicate Santa if you like, but if you have a blog, please link back to me! Have fun with it!

Tuesday, August 25, 2009

Stamped Gift idea


Need a gift? How about this little box and card set? After all, who hasn't reached for a little card to give a friend in a hurry!

You need the Box #2 die for this little guy, as well as the Big Shot Flower Daisy die and the level 3 Hostess set Kind & Caring Thoughts. Want to make one? Contact me to set up a workshop to make a box of your own! My hostesses always get whatever I make, so host a workshop, and you will have a gift box for yourself, and one for a friend!

Fall Craft-Punch Art Owl


So It is just my wishful thinking that is was fall and that school had started up again, but if you are feeling the same way, try out this cute little guy.

To make Mr. Owl you need some Stampin Up punches and the Big Shot Top Note Die. You need three shades of brown cardstock. I chose Chocolate Chip, Close to Cocoa and Creamy Caramel, but Soft Suede and Kraft would work too. I also used Whisper white, Pumpkin Pie, Dusty Durango, and Basic Black. You need a small cello bag, and two pop glue dots (or booger glue as I call them)

For punches:Scallop Circle, 1 3/8" circle, 1 1/4" circle, 1" circle, small oval.
You also need sponges and a stamp pad or two in the cardstock colors you choose.
Cut out the Chocolate Chip Top Note and score it in half. Fold it over and sponge around the edges.
Punch two scallop circles from Close to Caramel and sponge those as well. Then Punch out a 13/8" circle and tear it in half. I crumpled mine and sponged it. That is your eyelid. Punch out a Very Vanilla 1 1/4" eyeball and a 1" black pupil. I punched out two beaks with the small oval. I layered the Dusty Durango on the bottom and the pumpkin pie in the center.

I placed my beak down first, then my scallops, and layered the rest up on top. After that was complete, I filled my bag with candy corn, but carmel popcorn, or any other candy would be lovely. I loved the bright orange color of the candy corn:) This would make a great halloween treat bag.

To assemble the bag, fill it with candy, fold it over then staple it shut. Place a booger glue dot on each side, and squeeze the edges of the owl on top. You are done! Yeah!! Quick, fun and totally adorable.

To Order any of the punches needed to make this guy, click here to access my store 24/7.

Thursday, April 2, 2009

Thank you Gift


This adorable little purse was made using 4 Big Shot Scallop Envelopes. 2 cardstock, 2 with Designer Series Paper. I also used ribbon, and brads, and a stamp set. This makes a great thank you gift, a hostess gift, or a gift for a teacher. It came together simply and was fun to make!
Related Posts with Thumbnails